Where can IP camera surveillance systems be used? How can IP cameras be deployed using PoE switches? This article will provide detailed answers to these questions.
Deploying IP cameras using PoE switches can save time and network costs; moreover, IP cameras are not limited by power outlets, making installation more flexible and convenient. Based on this, the PoE switch and IP camera partnership model has been widely adopted in various industries, such as home security monitoring to help users monitor property security; traffic monitoring to remotely monitor train stations, highways, and airports; and industrial monitoring to monitor production processes and warehouse management. So, how do you deploy IP cameras using a PoE switch?
Regardless of the model of PoE switch or IP camera you choose, the connection methods and usage are basically the same. You can purchase the necessary monitoring equipment according to your actual needs and install it in different locations. Here, we will use a home security monitoring application as an example to explain the connection steps of a PoE switch and an IP camera.
Step 1: Determine the installation location of the IP camera
In home networks, IP cameras should not be installed too low to prevent accidental damage, nor too high to facilitate maintenance. Therefore, it is recommended that indoor installation height be higher than 2.5 meters, and the distance between the IP camera and the PoE switch should be kept within 100 meters. During installation, avoid direct sunlight (such as from direct sunlight or lamps) on the IP camera lens, as this can easily cause excessive brightness or glare. Also, avoid installing the IP camera under windows, as infrared reflection can cause overexposure of the monitored video or images.
Step 2: Install a fixed IP camera
After determining the installation location, drill holes at that location to install the IP camera. Ensure the IP camera bracket is firmly and stably mounted on the wall to prevent image shake, and adjust the IP camera angle appropriately to obtain the optimal monitoring angle.
Step 3: Determine the installation location for the network cable used to connect the IP camera.
After determining the installation location of the IP camera, drill holes in a suitable location nearby to pre-install network cable interfaces. If you need to install the IP camera on a higher second or third floor, consider using the optimal cabling solution, i.e., the shortest distance from the installation point to the nearest network access point.
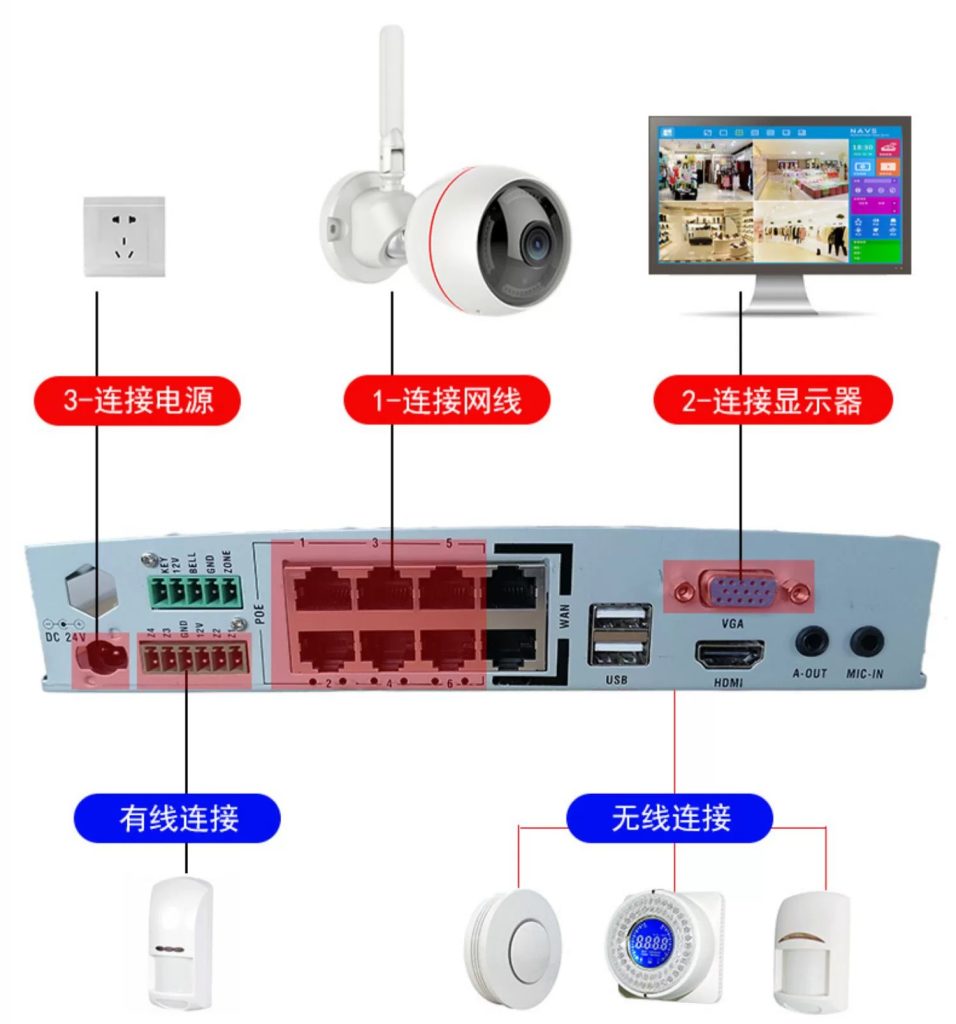
Step 4: Connect the IP camera to the PoE switch
After completing the first three steps, the next step is to connect your home IP surveillance system equipment. A complete IP surveillance system typically consists of a PoE switch, IP cameras, a network video recorder (NVR), a monitoring display device (such as a computer or television), and Ethernet cables. Figure 2 shows a connection application of an 8-port PoE gigabit switch provided by FS and three IP cameras. The specific connection steps are as follows:
- Insert the power cord into the power port of the PoE switch and turn on the power;
- Connect the PoE switch and router using an Ethernet cable, and ensure that the switch can access the Internet.
- Connect the IP camera to the PoE port of the PoE switch using an Ethernet cable; the PoE switch powers the IP camera and transmits data via the Ethernet cable.
- Connect the PoE switch and NVR using an Ethernet cable, and connect the NVR and monitoring display device using a VGA or HDMI high-definition cable. When connecting, please ensure you use the corresponding interfaces.
Step 5: IP Camera System Setup
This is the final step in the installation process. IP cameras come pre-installed with application software or desktop management software. You can select different functions, such as live view, motion detection, and video recording, according to the software specifications to meet your various monitoring needs.
After completing the above steps, the PoE switch and IP camera are successfully connected, and the IP camera can work normally.